This is how your bike is delivered
Pre-assembly & check on site
Whether it's a road bike, mountain bike, city bike or e-bike - before your bike is shipped, it is carefully pre-assembled, pre-set and checked by our mechanics. This includes, among other things:
- Checking and retightening the wheels
- Checking the headset lubrication
- Adjusting the bicycle brakes
- Adjusting and checking the suspension and gears
- Checking bolts for tightness
- Check suspension fork for installation and function
- Carry out function check & software updates for e-bikes
Individually agreed modifications are of course also taken into account and prepared. Our mechanics adjust the bike to your wishes and needs and fit your additional equipment.
Afterwards, a short test ride is carried out.
After this thorough inspection and adjustment, the bike is carefully padded and packed in a special shipping box. For packing reasons, your bike will be delivered without pedals and with the handlebars (stem) positioned crosswise. This ensures that your bike arrives safely and securely. Unpacking and assembling is done in a few simple steps. Then nothing stands in the way of riding fun!
We'll help and show you here how quick and easy it is to assemble your bike. In just a few minutes your bike is ready to use and ride.
The following 4 steps are necessary:
- Take the bike out of the packaging
- Mount the pedals
- Tighten the handlebars (stem)
- Adjust the saddle height
- The steps are explained in detail below:
1. take the bike out of the box and remove the packaging protection

2. take the pedals out of the packaging and mount them

Step 1:
The pedals are marked, depending on the bicycle model:
L - left pedal, left-hand thread
R - right pedal, right-hand thread
Note: The labelling is missing on some models.
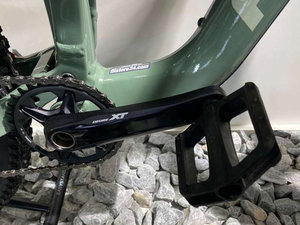
Step 2:
Screw the left pedal into the left pedal crank, the right pedal into the right pedal crank.
Always screw the pedals into the thread of the crank in the direction of travel.
Depending on the bicycle model, an Allen key or open-ended spanner is needed for this.
Note: If the pedal cannot be easily screwed in (mounted),
first check the pedals on the left/right side.
An Allen key (4, 5, 6) or open-ended spanner (15) is required to screw in (mount) the pedals.
3. straighten the handlebars (stem) and tighten them
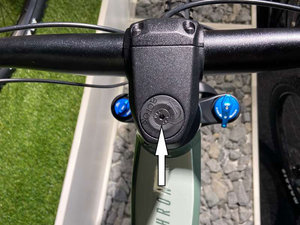
Step 3:
Make sure the handlebars are at right angles to the longitudinal axis of your bike.
Hand-tighten the headset screw (or Ahead headset) at the top of the handlebar by a quarter turn.
Important: Do not overtighten this adjustment screw.
Depending on the model, you will need an Allen key or a Torx (T20/T25) for the assembly.
Then, with the brake applied, check that the handlebar is tight in the steerer tube (bicycle fork at the front) and can no longer be moved back and forth.
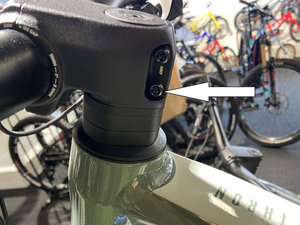
Step 4:
Turn and adjust the handlebars so that you can comfortably grip the shifters and brake levers with your fingertips and your wrists are aligned straight.
Tighten the bolt(s) in the side of the stem.
The handlebars should now be adjusted and turn left and right without any problems.
4. adjust saddle height
Depending on the type of bike, the seating position varies from upright, comfortable to sporty, aerodynamic.
The following should be noted:
The saddle should be approximately at pelvic bone height. First loosen the bolt(s)/quick-release of the saddle clamp.
It is best to stand sideways next to the bike to adjust the saddle straight forward to the appropriate height. Then tighten the bolt(s)/quick-release of the saddle clamp carefully and firmly.
Note that the minimum insertion depth and the maximum seat height are marked with a line on the frame seat tube.
After the first (rough) adjustment, sit on your bike. Put your feet on the pedals and make sure that your legs are not fully extended at the lowest point when turning the crank. If the pelvis tilts, adjust the saddle height a little further down (lower).
Done!
If you have any questions or need further support, please contact us at +43 (0) 4852-68866 or via e-mail info@fitstore24.com